


Building and deploying Serverless applications using AWS SAM and GitHub Actions


Table of contents
- Introduction
- When to use AWS Lambda ?
- The Project
- Prerequisites
- Understanding the application
- Folder Structure
- Creating IAM user
- Creating handler function
- Creating the AWS SAM template file
- Setting up AWS simple email service (SES)
- Testing our API
- Packaging and Deploying the Application
- Automating deploying of SAM application using GitHub Actions
- Conclusion
Introduction
Cloud is here to stay and more and more developers are seeking ways to incorporate effectively the virtual world of cloud and thus provide the best performance and efficiency. There are many types of cloud service models, In this post, we would be majorly dealing with the AWS Lambda and SAM (Serverless Application Model).
AWS SAM is an open-source framework that can be used to develop serverless applications on AWS. A serverless application is a combination of Lambda functions, event sources, and other resources that work together to perform tasks.
AWS Lambda is a serverless, event-driven compute service that lets you run code for virtually any type of application or backend service without provisioning or managing servers. You can trigger Lambda from over 200 AWS services and software as a service (SaaS) applications and only pay for what you use. AWS Lambda is categorized under function as a service (FaaS).
When to use AWS Lambda ?
AWS Lambda runs code in response to events ("event-driven"), while automatically taking care of all backend infrastructure that is needed to run the code. Lambda can be used in several different scenarios, it is easy to get started with, and can run at minimal costs. It can be used when you need flexibility, it is often called the "Swiss Army Knife" of the AWS platform for developers and cloud architects.
The Project
I was developing my portfolio website that is when I identified a use case, the portfolio has a contact form that needed to be made functional. Whenever the user clicks on submit button an email should be sent to my email address with the form details. In this post, we would be using AWS lambda for addressing the above use case. The reason we choose AWS Lambda for the above use case is that we just want our code to get executed only when an event is triggered so that we don't have to pay for keeping the server up all the time, also AWS lambda relieves us from the hassle of managing the resources, we just need to provide the business code and AWS will take care of everything. I know using java for creating lambda function is not a good idea as an interpreted language like a python would take less time to respond to events but since there are not many resources available to demonstrate building a SAM application using java, I would be writing the business logic in java.
Prerequisites
- AWS Account:- AWS Account will be used for accessing AWS services
- AWS CLI:- AWS CLI is a tool for accessing AWS console using a command-line interface.
- AWS SAM CLI:- AWS SAM CLI is a command-line tool for AWS SAM which makes creating and managing serverless applications easy.
- Docker:- AWS SAM provides a local environment that's similar to AWS Lambda to use as a Docker container which can be used to build, test, and debug our serverless applications.
- Java 11:- We would be writing the business logic in Java
- Maven:- Maven is a build tool used for building java applications
- GitHub:- We will discuss this in the latter part of the post.
Understanding the application
This application implements a basic API backend. It will consist of AWS API Gateway for handling the requests, AWS lambda for running the business logic, and AWS SES for sending emails. Whenever a POST request would be made to the API gateway endpoint, the lambda function is going to get invoked. This function will send the form data to a specified email address.
Folder Structure
Our project is going to have the following file structure. It's not final yet, we would be adding files to configure Github actions.
📦portfolio-contact-me
 ┣ 📂src
 ┃ ┗ 📂main
 ┃ ┃ ┗ 📂java
 ┃ ┃ ┃ ┗ 📂com
 ┃ ┃ ┃ ┃ ┗ 📂portfolio
 ┃ ┃ ┃ ┃ ┃ ┗ 📂contact
 ┃ ┃ ┃ ┃ ┃ ┃ ┣ 📂beans
 ┃ ┃ ┃ ┃ ┃ ┃ ┃ ┗ 📜ContactForm.java
 ┃ ┃ ┃ ┃ ┃ ┃ ┗ 📂handler
 ┃ ┃ ┃ ┃ ┃ ┃ ┃ ┗ 📜ContactFormHandler.java
 ┣ 📂target
 ┣ 📜pom.xml
 ┗ 📜template.yaml
Creating IAM user
We would need an IAM user to access AWS CLI. Login into AWS Console and under IAM user create a user and a group having following permissions.
- IAMFullAccess
- AmazonS3FullAccess
- CloudWatchLogsFullAccess
- AWSLambdaRole
- AWSCloudFormationFullAccess
- AWSLambda_FullAccess
Once the user is created, download the user detail. Now let's configure AWS CLI. Run
AWS configure
on the command line and enter the details asked. With this setup done, we can now access/query the AWS resources from our command line.
Creating handler function
If you look at the folder structure then we have com.portfolio.contact.beans.ContactForm.java and com.portfolio.contact.handler.ContactFormHandler.java.
Our ContactForm.java has the following code
package com.portfolio.contact.beans;

import java.text.MessageFormat;

public class ContactForm {
    private String name;
    private String email;
    private String message;

    public String getName() {
        return name;
    }

    public String getMessage() {
        return message;
    }

    public void setMessage(String message) {
        this.message = message;
    }

    public String getEmail() {
        return email;
    }

    public void setEmail(String email) {
        this.email = email;
    }

    public void setName(String name) {
        this.name = name;
    }

    @Override
    public String toString() {
        return MessageFormat.format("Name : {0}\nEmail : {1}\nMessage : {2}", this.name, this.email, this.message);
    }

}
We would be deserializing JSON received as request body into an object of type ContactForm, we have 3 fields name, email, and message.
ContactFormHanlder.java has the following code
package com.portfolio.contact.handler;

import com.google.gson.Gson;
import com.portfolio.contact.beans.ContactForm;
import com.amazonaws.services.lambda.runtime.Context;
import com.amazonaws.services.lambda.runtime.LambdaLogger;
import com.amazonaws.services.lambda.runtime.RequestHandler;
import com.amazonaws.services.lambda.runtime.events.APIGatewayProxyRequestEvent;
import com.amazonaws.services.lambda.runtime.events.APIGatewayProxyResponseEvent;

import java.util.HashMap;
import java.util.Map;

import com.amazonaws.regions.Regions;
import com.amazonaws.services.simpleemail.AmazonSimpleEmailService;
import com.amazonaws.services.simpleemail.AmazonSimpleEmailServiceClientBuilder;
import com.amazonaws.services.simpleemail.model.Body;
import com.amazonaws.services.simpleemail.model.Content;
import com.amazonaws.services.simpleemail.model.Destination;
import com.amazonaws.services.simpleemail.model.Message;
import com.amazonaws.services.simpleemail.model.SendEmailRequest;

public class ContactFormHandler implements RequestHandler<APIGatewayProxyRequestEvent, APIGatewayProxyResponseEvent> {
        private Gson gson = new Gson();

        static final String FROM = System.getenv("SENDER_EMAIL");
        static final String TO = System.getenv("RECEIVER_EMAIL");
        static final String SUBJECT = "PORTFOLIO CONTACT FORM";

        public APIGatewayProxyResponseEvent handleRequest(final APIGatewayProxyRequestEvent input,
                        final Context context) {
                Map<String, String> headers = new HashMap<>();
                headers.put("Content-Type", "application/json");
                headers.put("X-Custom-Header", "application/json");
                LambdaLogger logger = context.getLogger();
                ContactForm contactForm = gson.fromJson(input.getBody(), ContactForm.class);
                logger.log(contactForm.toString());
                AmazonSimpleEmailService client = AmazonSimpleEmailServiceClientBuilder.standard()
                                .withRegion(Regions.AP_SOUTH_1).build();
                SendEmailRequest emailRequest = new SendEmailRequest()
                                .withDestination(
                                                new Destination().withToAddresses(TO))
                                .withMessage(new Message()
                                                .withBody(new Body()
                                                                .withText(new Content()
                                                                                .withCharset("UTF-8")
                                                                                .withData(contactForm.toString())))
                                                .withSubject(new Content()
                                                                .withCharset("UTF-8").withData(SUBJECT)))
                                .withSource(FROM);
                client.sendEmail(emailRequest);
                APIGatewayProxyResponseEvent response = new APIGatewayProxyResponseEvent();
                return response
                                .withStatusCode(200).withHeaders(headers);
        }

}
In the above handler function, we are deserializing input data into an object of type ContactForm using GSON, logging the contact form details, and then we are sending the contact form data as an email using amazon's simple email service (AWS SES). Now here I have accessed two environment variables named SENDER_EMAIL and RECEIVER_EMAIL having value as sender and receiver email address. The reason I have used environment variables is to avoid hardcoding data. As helping libraries, Gson and Amazon AWS-lambda-java-events were used to interact with API gateway properly. For the above code to compile we have to add the following dependencies to our pom.xml.
   <dependency>
      <groupId>com.amazonaws</groupId>
      <artifactId>aws-java-sdk-ses</artifactId>
      <version>1.12.147</version>
   </dependency>
   <dependency>
      <groupId>com.google.code.gson</groupId>
      <artifactId>gson</artifactId>
      <version>2.8.9</version>
   </dependency>
   <dependency>
      <groupId>com.amazonaws</groupId>
      <artifactId>aws-lambda-java-core</artifactId>
      <version>1.2.1</version>
   </dependency>
   <dependency>
      <groupId>com.amazonaws</groupId>
      <artifactId>aws-lambda-java-events</artifactId>
      <version>3.11.0</version>
   </dependency>
Also, we would have to add the following plugin to our pom.xml
<plugin>
   <groupId>org.apache.maven.plugins</groupId>
   <artifactId>maven-shade-plugin</artifactId>
   <version>3.2.4</version>
   <executions>
      <execution>
         <phase>package</phase>
         <goals>
            <goal>shade</goal>
         </goals>
      </execution>
   </executions>
</plugin>
Now we have our handler function ready, run mvn clean package from our project directory, this would create a jar named ContactFormHandler-1.0.jar
Creating the AWS SAM template file
AWS SAM templates are an extension of AWS CloudFormation templates, with some additional components that make them easier to work with. It is categorized under Infrastructure as service (IaaS), in this we just have to declare in template what we want and AWS will create those services for us. Now let's have a look at our template.yaml.
AWSTemplateFormatVersion: '2010-09-09'
Transform: AWS::Serverless-2016-10-31
Description:
  Handler application for portfolio contact form
# More info about Globals: https://github.com/awslabs/serverless-application-model/blob/master/docs/globals.rst
Globals:
  Function:
    Timeout: 20
Resources:
  ContactFormHandler:
    Type: AWS::Serverless::Function # More info about Function Resource: https://github.com/awslabs/serverless-application-model/blob/master/versions/2016-10-31.md#awsserverlessfunction
    Properties:
      CodeUri: target/ContactFormHandler-1.0.jar
      Handler: com.portfolio.contact.handler.ContactFormHandler::handleRequest
      Runtime: java11
      Policies :
        - AmazonSESFullAccess
      Architectures:
        - x86_64
      MemorySize: 512
      Environment: # More info about Env Vars: https://github.com/awslabs/serverless-application-model/blob/master/versions/2016-10-31.md#environment-object
        Variables:
          SENDER_EMAIL: # Email that should send the mail
          RECEIVER_EMAIL: #  Email that should receive the mail
      Events:
        ContactForm:
          Type: Api # More info about API Event Source: https://github.com/awslabs/serverless-application-model/blob/master/versions/2016-10-31.md#api
          Properties:
            Path: /contact
            Method: POST

Outputs:
  # ServerlessRestApi is an implicit API created out of Events key under Serverless::Function
  # Find out more about other implicit resources you can reference within SAM
  # https://github.com/awslabs/serverless-application-model/blob/master/docs/internals/generated_resources.rst#api
  ContactFormApi:
    Description: "API Gateway endpoint URL for Contact Form Handler function"
    Value: !Sub "https://${ServerlessRestApi}.execute-api.${AWS::Region}.amazonaws.com/contact"
  ContactFormHandler:
    Description: "Contact Form Handler Lambda Function ARN"
    Value: !GetAtt ContactFormHandler.Arn
  ContactFormHandlerIamRole:
    Description: "Implicit IAM Role created for Contact Form Handler function"
    Value: !GetAtt ContactFormHandlerRole.Arn
In the above template, we have to specify sender's and receiver's emails under variable. The emails that we specify here would be available values against environment variables SENDER_EMAIL, RECEIVER_EMAIL. This template is going to generate the following resources.
- A Contact form handler lambda function.
- An AWS API gateway for accessing our Contact Form handler lambda function.
- An IAM role that would be used by the Contact Form handler lambda function for execution.
Setting up AWS simple email service (SES)
For sending emails through AWS SES we have to add verified identities in AWS SES. The following steps can be used to add verified-
- Login to AWS console
- Head to AWS simple email service under all services.
- Click on verified identities under configuration
- Click on Create identity and proceed with the email address in identity type, after filling the form and clicking on create the identity you will receive a confirmation email having a link to confirm email id, click on the link and your email address would be added to verified identities.
Note: We have to follow the last step for both email ids i.e. Sender's and receiver's email.
Testing our API
For testing the API, run the following command from your project directory.
sudo sam local start-api
This is going to create a local HTTP server that hosts all of our functions.

This is going to start our API on port 3000, we can use Postman to test our API. When it's accessed (through a browser, CLI, and so on), it starts a Docker container locally to invoke the function. It reads the CodeUri property of the AWS::Serverless::Function resource to find the path in our file system that contains the Lambda function code.
Packaging and Deploying the Application
Now we have our application ready, we are going to package and deploy it to AWS, but before that, we have to create a bucket so that we could store the zip of code and dependencies created by the sam package command.
Creating AWS S3 bucket
For creating an S3 bucket head to the S3 management console and click on create bucket option in the console, enter bucket name (I am using portfolio-contact-form-lambda as the name for my bucket), proceed with default selections and a bucket with the specified name would be created.
Packaging our application
The next step is to package the application, run the following command
sam package --template-file template.yaml --s3-bucket portfolio-contact-form-lambda --output-template-file output-template.yml
In the above command we have used 3 flags to specify a template file name, s3 bucket name, and output file name. This command creates a .zip file of our code and dependencies and uploads the file to Amazon Simple Storage Service (Amazon S3). It then returns a copy of our AWS SAM template, replacing references to local artifacts with the Amazon S3 location where the command uploaded the artifacts in fie named as output-template.yml
Deploying the application
The next and final step is to deploy our application. Run the following command
sam deploy --guided
In the above command, we have used a guided flag that is going to activate the interactive mode, follow the instructions and enter whatever is asked during the process, you would be getting the following output as a result of the above command
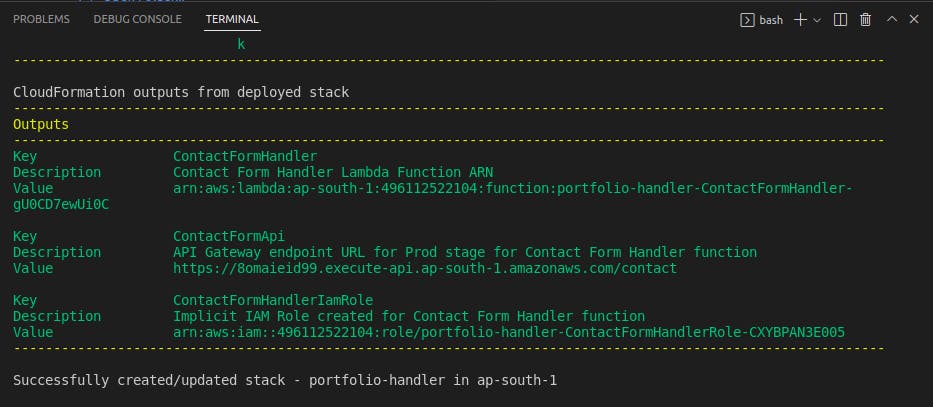 We have successfully created our API which we can access from the URL specified in the above screenshot.
Automating deploying of SAM application using GitHub Actions
We have successfully created the stack and deployed the application, let's understand a scenario we made some changes in our handler function now to update the stack on AWS we have to create the jar then package and deploy the application to AWS again. To tackle this situation we'll be using GitHub Actions. Now we don't have to worry about building our java application and packaging and deploying it to AWS, we'll just push the changes to our Github repository and GitHub CI/CD pipelines will take care of the rest.
Creating Github secrets
Firstly we have to create a GitHub repository and push our code on it, now the GitHub Actions CI/CD pipeline requires AWS credentials to access our AWS account, we will use the same credentials that we have created previously, but it is not advised and good practice to directly hardcode sensitive information and push it to a repository. This is where GitHub secrets come into the picture, these credentials must be stored as GitHub secrets within our GitHub repository, under Settings > Secrets. For more information, see “GitHub Actions secrets". In our GitHub repository, create two secrets named AWS_ACCESS_KEY_ID and AWS_SECRET_ACCESS_KEY and enter the key values. Also, we don't want that our sender's and receiver's email address should be hardcoded, so we will add 2 extra secrets FROM and TO having value as the respective email address. Since we have added secrets for email addresses, we should replace hardcoded emails in the template.yaml with placeholders FROM and TO, these placeholders would be replaced with the actual values by the pipeline. The template.yaml after the above changes would look like the following
AWSTemplateFormatVersion: '2010-09-09'
Transform: AWS::Serverless-2016-10-31
Description:
  It work
# More info about Globals: https://github.com/awslabs/serverless-application-model/blob/master/docs/globals.rst
Globals:
  Function:
    Timeout: 20

Resources:
  ContactFormHandler:
    Type: AWS::Serverless::Function # More info about Function Resource: https://github.com/awslabs/serverless-application-model/blob/master/versions/2016-10-31.md#awsserverlessfunction
    Properties:
      CodeUri: target/ContactFormHandler-1.0.jar
      Handler: com.portfolio.contact.handler.ContactFormHandler::handleRequest
      Runtime: java11
      Policies :
        - AmazonSESFullAccess
      Architectures:
        - x86_64
      MemorySize: 512
      Environment: # More info about Env Vars: https://github.com/awslabs/serverless-application-model/blob/master/versions/2016-10-31.md#environment-object
        Variables:
          SENDER_EMAIL: FROM
          RECEIVER_EMAIL: TO

      Events:
        ContactForm:
          Type: Api # More info about API Event Source: https://github.com/awslabs/serverless-application-model/blob/master/versions/2016-10-31.md#api
          Properties:
            Path: /contact
            Method: POST

Outputs:
  # ServerlessRestApi is an implicit API created out of Events key under Serverless::Function
  # Find out more about other implicit resources you can reference within SAM
  # https://github.com/awslabs/serverless-application-model/blob/master/docs/internals/generated_resources.rst#api
  ContactFormApi:
    Description: "API Gateway endpoint URL for Prod stage for Contact Form Handler function"
    Value: !Sub "https://${ServerlessRestApi}.execute-api.${AWS::Region}.amazonaws.com/contact"
  ContactFormHandler:
    Description: "Contact Form Handler Lambda Function ARN"
    Value: !GetAtt ContactFormHandler.Arn
  ContactFormHandlerIamRole:
    Description: "Implicit IAM Role created for Contact Form Handler function"
    Value: !GetAtt ContactFormHandlerRole.Arn
Creating the sam-pipeline.yml file
GitHub CI/CD pipelines are configured using a YAML file. This file configures what specific action triggers a workflow, such as push on main, and what workflow steps are required. At the root of our repository create a directory .github/workflows.
- Create a file named
sam-pipeline.ymlunder .github/workflows directory.📦portfolio-contact-me ┣ 📂.github ┃ ┗ 📂workflows ┃ ┃ ┗ 📜sam-pipeline.yml ┣ 📂src ┃ ┗ 📂main ┃ ┃ ┗ 📂java ┃ ┃ ┃ ┗ 📂com ┃ ┃ ┃ ┃ ┗ 📂portfolio ┃ ┃ ┃ ┃ ┃ ┗ 📂contact ┃ ┃ ┃ ┃ ┃ ┃ ┣ 📂beans ┃ ┃ ┃ ┃ ┃ ┃ ┃ ┗ 📜ContactForm.java ┃ ┃ ┃ ┃ ┃ ┃ ┗ 📂handler ┃ ┃ ┃ ┃ ┃ ┃ ┃ ┗ 📜ContactFormHandler.java ┣ 📂target ┣ 📜pom.xml ┗ 📜template.yaml - Edit the sam-pipeline.yml file and add the following.
on:
push:
 branches:
   - main
jobs:
build-deploy:
 runs-on: ubuntu-latest
 env :
   FROM : ${{ secrets.FROM }}
   TO : ${{ secrets.TO }}
 steps:
   - uses: actions/checkout@v2
   - uses: actions/setup-python@v2
   - uses: aws-actions/setup-sam@v1
   - uses: aws-actions/configure-aws-credentials@v1
     with:
       aws-access-key-id: ${{ secrets.AWS_ACCESS_KEY_ID }}
       aws-secret-access-key: ${{ secrets.AWS_SECRET_ACCESS_KEY }}
       aws-region: ap-south-1
   # Build Java
   - run: mvn clean package
   #Email subtitution
   - run : eval 'sed -i "s/SENDER_EMAIL:.*/SENDER_EMAIL':' $FROM/" template.yaml'
   - run : eval 'sed -i "s/RECEIVER_EMAIL:.*/RECEIVER_EMAIL':' $TO/" template.yaml'
   # sam package
   - run: sam package --template-file template.yaml --s3-bucket portfolio-contact-form-lambda --
             output-template-file output-template.yml
    # sam deploy
   - run: sam deploy --no-confirm-changeset --no-fail-on-empty-changeset --stack-name portfolio-
              handler --s3-bucket portfolio-contact-form-lambda --capabilities CAPABILITY_IAM --region
              ap-south-1
Deploying our application
Add all files to the local git repository, commit the changes and push to GitHub.
git add .
git commit -m 'added sam-pipline.yml'
git push
Once the files are pushed to GitHub on the main branch, this automatically triggers the GitHub Actions CI/CD pipeline as configured in the sam-pipeline.yml file. The GitHub actions runner performs the pipeline steps specified in the file.
To view the application deployment progress, select Actions in the repository menu. Select the workflow run and select the job name build-deploy.
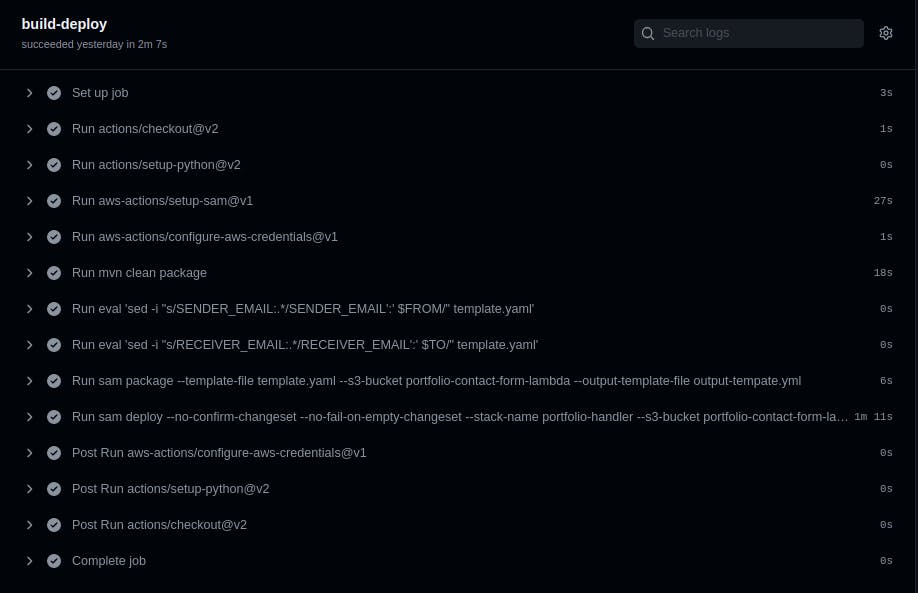
If the build fails, you can view the error message.
Conclusion
GitHub Actions is a GitHub feature that allows you to run a CI/CD pipeline to build, test, and deploy software directly from GitHub. AWS SAM is an open-source framework for building serverless applications.
In this post, we used GitHub Actions CI/CD pipeline functionality and AWS SAM to create, build, test, and deploy a serverless application. The GitHub action setup-sam installed AWS SAM on the GitHub hosted runner. The GitHub Actions workflow uses the sam package to create the application artifacts and sam deploy to deploy them to our AWS account.
The full implementation of this tutorial can be found over on Github.
You can refer to my portfolio from here .